So i finally figured it out, by piecing many sources of code from around the internet.
Step 1. create a custom control.
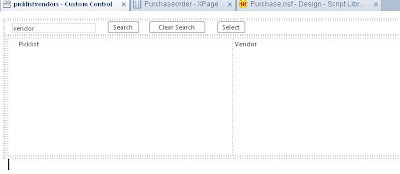
Create a custom control and put your view on it, and put a search bar and a select button above it like this, make the first column have a check box option

Configure this for searching.... click here if you do not know how to do this.
On the select button "on click" event put this code in, it gets the selected documents, then it gets a value from the document and then adds it to the field on my main form. I got this code form the developer wiki function printToLog(stuff) {
_dump("\r\nPRINT START\r\n");
_dump(stuff);
_dump("\r\nPRINT END\r\n");
}
var database = session.getDatabase("notes1", "applications\\viewpoint.nsf")
var viewPanel=getComponent("viewPanel1"); get the componet of viewPanel
var docIDArray=viewPanel.getSelectedIds(); get the array of document ids
printToLog('got ids')
for(i=0;
i < docIDArray.length;
i++){
var docId=docIDArray[i];
printToLog(docId)
var doc=database.getDocumentByID(docId);
printToLog(doc)
if(doc != null){
var pickthis1 = doc.getItemValueString("projectnum")
printToLog(pickthis1)
}
}
if(pickthis1 != null){
dominoDocument1.replaceItemValue("job", pickthis1)
}
dijit.byId('Dialog3').hide();
This closes the dialog we will create in a moment. Save and close that custom control.
On your main form you need to add this client side javascript function, i found this on the forum, unless you use this you can not click any buttons on your dialog or search or update. .
/**
* Creates a dijit dialog box based on a div content

* @param id div identifier

*/


function dialog_create(id, title1) {

var dialogWidget = dijit.byId(id);

if( dialogWidget )

dialogWidget.destroyRecursive(true);

dialogWidget = new dijit.Dialog(

{ title: title1, duration:600},

dojo.byId(id));


var dialog = dojo.byId(id);

dialog.parentNode.removeChild(dialog);


var form = document.forms[0];

form.appendChild(dialog);

dialogWidget.startup();

}
Next add this to the source of your page, notice the<> is the picklist custom control we just created 
At the top of the XPage in source view, you need to add the onload function to call the function to create the dialog  Then we create a button to show the dialog with client side javascript.
dijit.byId('Dialog3').show()
Then you will have something that works like a picklist, once you do it once it gets much easier.

