Creating Google Gadgets with IBM Lotus Notes 8.5.1
Rehan Altaf
Software Engineer
IBM Software Group
Austin, TX USA
Obinna C. Agumadu
Software Engineer
IBM Software Group
Austin, TX USA
December 2009
Summary: This article provides a step-by-step guide to using Google Gadgets with the IBM® Lotus® Notes® 8.5.1 Client. Included are examples and usage options for deploying Google Gadgets.
Table of Contents
1 Introduction 1
2 Configuring a Google Gadget 3
3 Determining if a Google Gadget supports Live Text 8
4 Conclusion 9
5 Resources 10
About the authors 10
1 Introduction
One of the powerful aspects of the Lotus Notes widgets functionality is the Live Text feature, with which you can configure a widget that recognizes a particular string and then act on the highlighted text.
To activate the Live Text feature:
1. With a Lotus Notes 8.5.1 client open, from the menu select File > Preferences > Live Text (see figure 1).
2. Check the “Enable Live Text by default for all opened documents” option and then click OK.
Figure 1. Enable Live Text

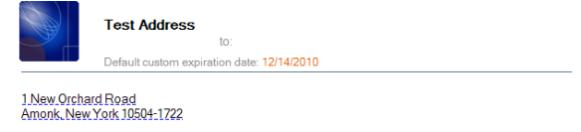
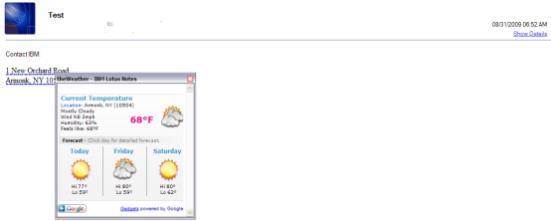
Once Live Text has been enabled, and a particular widget has been configured, you'll notice that certain types of text will be highlighted, as shown in figure 2. The action contained in this widget makes the highlighting of the text possible by means of a wired component and recognizer.
In this case, the address on any document is what is recognized. You can right-click on the highlighted text and select the widget to activate the action.
Figure 2. Highlighted text example
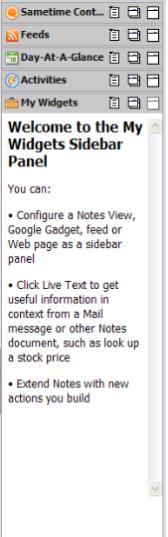
The widgets functionality in Lotus Notes allows you to create widgets based on Google Gadgets, most of which are suitable for displaying contents on the My Widgets sidebar in the Notes client (see figure 3).
Figure 3. My Widgets sidebar
Typically, widget users want to leverage the Live Text functionality. However, not all Google Gadgets are able to make use of this feature and, unfortunately, there is really no good way to determine which Google Gadget will be able to make use of the Live Text functionality (see Section 3, “Determining if a Google Gadget supports Live Text,” of this document for more information).
2 Configuring a Google Gadget
Here we demonstrate how to configure a Google Gadget that makes use of the Live Text functionality.
Before starting, make sure that the My Widgets sidebar is displaying in the Notes client. If it's not, you can display the sidebar by selecting File > Preferences > Widgets from the menu and enabling the “Show Widget Toolbar and the My Widgets Sidebar panel” option. After you click OK, the sidebar panel will display.
Let's suppose you want to configure a widget based on the Google Gadget “theWeather”:
http://www.google.com/ig/directory?synd=open&url=http%3A%2F%2Fwww.notkewl.com%2FmyWeather%2FmyWeather.xml.
To do this, follow these steps:
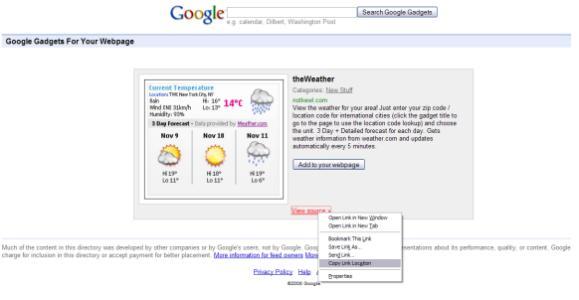
1. Go to the URL above. Once there, select the Copy Link Location option for “View source” and copy the link (see figure 4); you will need this in Step 4 below.
Figure 4. Copy URL Location
2. In the Notes 8.5.1 client, select Tools > Widgets > Getting Started with Widgets, from the menu. (Alternatively, you can use the “My Widgets” sidebar panel, clicking the menu icon and selecting Get Started from the drop-down list.)
3. When the Start Configuring Widgets window appears, select the Google Gadgets radio button under “Where is the information you want to display?”; click Next.
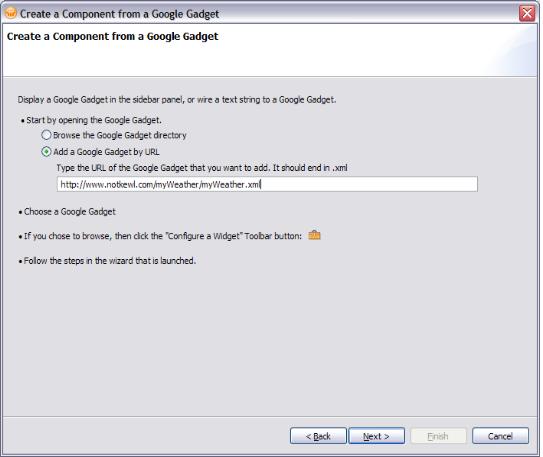
4. In the Create a Component From a Google Gadget window (see figure 5), select the radio button option “Add a Google Gadget by URL” and paste into the text box the link for “View source” (from Step 1 above).
Figure 5. Adding a Google Gadget by URL
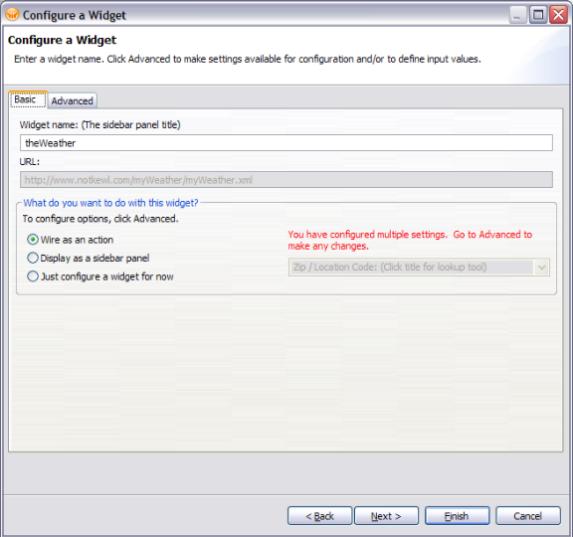
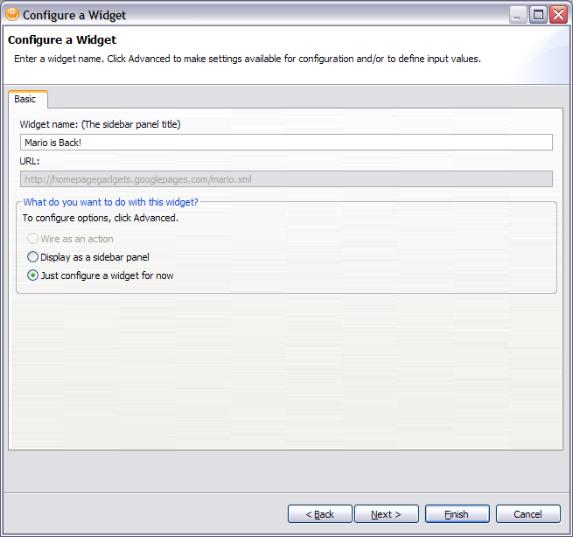
5. Click Next twice to arrive at the Configure a Widget window shown in figure 6. In the “What do you want to do with this widget?” section in the Basic tab, select the “Wire as an action” option.
Figure 6. Configure a Widget window
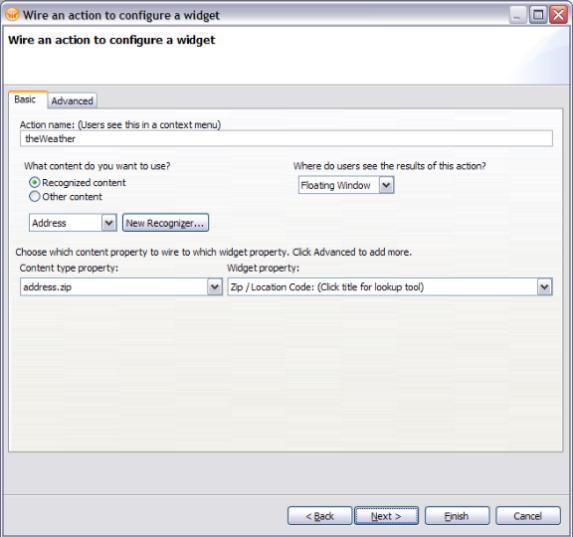
1. Click Next; the “Wire an action to configure a widget” window displays, in which we fill in the fields as follows (see figure 7):
Action name: theWeather
What content do you want to use? Recognized content
Where do users see the results of this action? Floating Window
Content type property: address.zip
Widget property: Zip / Location code (click title for lookup tool)
Figure 7. Wire an action to configure a widget
7. Click Next, and then click Finish, to complete the configuration process.
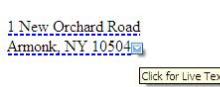
4. To test our widget, merely find a document that contains an address. The address should be highlighted, thanks to Live Text. Hover over the highlighted address; you'll see a blue arrow at the end of the sentence (see figure 8).
Figure 8. Blue Arrow
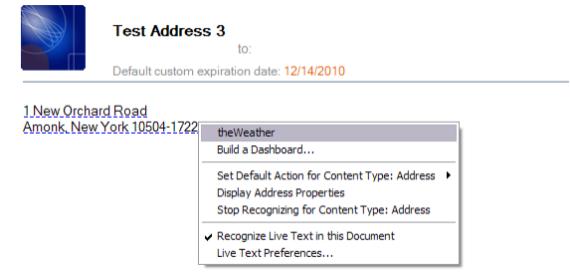
9. Click on the arrow to reveal the list of options; select “theWeather” (see figure 9).
Figure 9. Blue Arrow options
The final outcome should be as depicted as shown in figure 10.
Figure 10. Outcome of widget
NOTE: Since Google Gadgets are created and offered by a third party, it's possible that a Gadget might not function properly due to problems with the third party's server.
3 Determining if a Google Gadget supports Live Text
As we mentioned in the Introduction section, not all Google Gadgets are able to leverage the Live Text functionality because they don't really have a component that can be wired.
Moreover, it's difficult to determine which Google Gadget does not have component configuration; you can't just look at the posted Google Gadget and easily discern this fact. However, one good way to determine this during the configuration of a Google Gadget widget. Specifically, when you come to the Configure a Widget window (see figure 11), notice that the “Wire as an action” option is grayed out. This is usually a clear indication that the widget cannot be configured for Live Text.
Figure 11. “Wire as an action” option grayed out
On the other hand, if you see the “Wire as an action” option at the bottom of the Configure a Component window, then this widget can be configured to use the Live Text feature.
4 Conclusion
You should now have a good idea of the steps involved and what to expect when configuring a Google Gadget widget, keeping in mind that most Google Gadgets were not designed to be able to make use of the Live Text functionality.
5 Resources
- developerWorks article, “Building composite applications with Notes widgets in IBM Lotus Notes 8.0.1”:
http://www.ibm.com/developerworks/lotus/library/notes8-widgets/
- developerWorks article, “Implementing and deploying Google gadgets for the Lotus Connections Home page”:
http://www.ibm.com/developerworks/lotus/library/connections-gadgets/
- Lotus Notes and Domino product page:
http://www.ibm.com/developerworks/edu/wa-dw-wa-google1.html
About the authors
Obinna Agumadu is a Staff Software Engineer working with the IBM Lotus Application Development L2 team, currently serving as the product area expert for the Notes My Widgets feature. He has four years combined experience working with Domino Server and Application Development L2 teams, and is a Certified Application Developer for Lotus Domino versions 6, 7, and 8. He received his Bachelor's degree in Computer Information Systems from Texas State University-San Marcos.
Rehan Altaf is a member of the Lotus Quickr for Domino Services L2 team. Previously, he worked on the L2 Application Development team, providing support to customers in designing applications using Domino Designer, Composite Applications, and programming languages such as LotusScript, Java, and Formula language. He's a Certified Advanced Application Developer for Lotus Domino versions 6.5, 7, and 8, and earned his Bachelor's degree in Computer Science from The University of Texas at Austin.